HTML 은 Hyper Text Markup Language의 약자 이다
<html>
	<head>
		<title>JT</title>
	</head>
	<body>
		Hello World!
	</body>
</html>- HTML 은 반드시 head 와 body가 있어야 한다
- head 와 body의 끝맺음을 빼먹지 않는것도 중요하다
- <title>은 웹사이트의 이름이된다
- 주로 <body>에 코드들을 적는다고 생각하면 편하다
< > 안에 들어가는 코드들은 tag (태그) 라고 생각하면 된다
Heading tags
<body>
	<h1>Heading 1</h1>
	<h2>Heading 2</h2>
	<h3>Heading 3</h3>
	<h6>Heading 6</h6>
	Normal text...
</body>
h1 이 가장 중요한 heading이 된다
h6 은 가장 중요하지 않은 heading 이다
Paragraph tag <p>
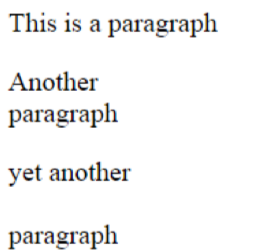
<body>
	<p>This is a paragraph</p>
	<p>Another
	paragraph</p>
	<p>yet another
	paragraph</p>
</body>
글자들을 여러 방법으로 띄어쓰기를 이용해서 띄워놓았지만 paragraph 속성이여서 하나의 문단으로 표현된다
Line break <br />
<body>
	<p>This is a paragraph</p>
	<p>Another <br />
	paragraph</p>
	<p>yet another <br />
	<br />
	paragraph</p>
</body>
<br /> 은 문장을 끊는 코드라고 생각하면 된다. 비어있는걸로 인식이 되어서 혼자서 시작과 끝맺음을 할 수 있다.
Horizontal line <hr />
<body>
	<p>This is a paragraph</p>
	<p>Another <br />
	paragraph</p>
	<hr />
	<p>yet another <br />
	<br />
	paragraph</p>
</body>
<hr /> 은 가로로 된 선을 하나 만들어 준다
Non-breaking space
<body>
<p>This is a
paragraph</p>
<p>Another <br />
paragraph</p>
<hr />
<p>yet another <br />
<br />
paragraph</p>
</body> 는 빈 공간을 만들어준다 (띄어쓰기)
Character Entity
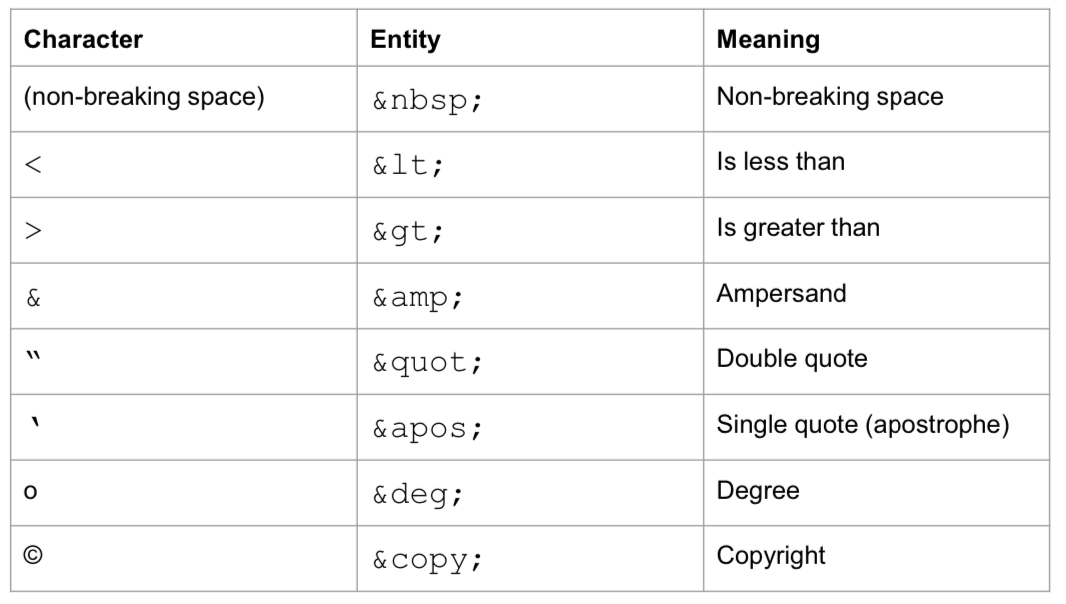
<body>
A HTML document starts with
<html> and ends with
</html>
</body>코드 안에서 <,> 와 같은 부등호를 사용한다면 코드로 인식하여서 에러를 도출 할 수 있으니 < 와 > 를 이용해서 표현 할 수 있다
Block quotations <blockquote>
<body>
	<p>normal paragraph</p>
	<blockquote>
	<p>a paragraph in blockquote</p>
	<p>another paragraph in blockquote</p>
	</blockquote>
	see the difference?
</body>
<blockquote> 안에서는 어떤 문장을 작성하든 웹 페이지에는 문장 시작부분에 빈 공간이 존재함
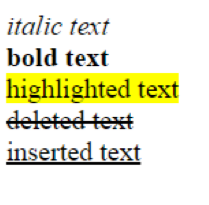
Formatting text
<body>
	<i>italic text</i> <br />
	<b>bold text</b> <br />
	<mark>highlighted text</mark> <br />
	<del>deleted text</del> <br />
	<ins>inserted text</ins> <br />
</body>
텍스트를 적을때 유용한 효과들이다
Preformatted text <pre>
<body>
	<pre>
	Mary
		had a
			little
				lamb
	</pre>
</body>
입력 한 모든 텍스트 형태를 결과로 노출시킴
Computer Code
<body>
	<pre>
		<code>
			a = 0;
			b = 3;
			c = 2;
			sum = a + b + c;
		</code>
	</pre>
</body>
<body>
<pre>
<code>
#include <iostream>
void main( ) {
cout << "Hello World!" << endl;
}
</code>
</pre>
</body>
Image
<body>
	<img src="uow-logo.png" height="300" width="200"
	alt="logo of UOW" />
</body>
src 는 이미지의 출처/소스 를 의미함 (파일 위치, 이미지 링크)
height는 이미지의 길이
width는 이미지의 폭
alt는 이미지의 이름 (만약 브라우저의 이미지가 표시가 안된다면 alt를 표시함)
Link
<body>
	<a href="http://www.uow.edu.au" target="_blank">Visit UOW</a>
	<a href="contact.html">Contact us</a>
	<a href="http://www.uow.edu.au" target="_blank">
	<img src="uow-logo.png" alt="visit UOW"/></a>
</body>
target="_blank" 는 새로운 창을 열게 함 / "_self" 현재 창에서 열게 함
Link - 타겟이 있는 글
<a href="#Proofs">1 Proofs</a>
<a href="#See_also">2 See also</a>
<a href="#Notes">3 Notes</a>
<a href="#References">4 References</a>
<a href="#External_links">5 External links</a>
<h3 id="Proofs">Proofs</h3>
…
<h3 id="See_also">See also</h3>
…
<h3 id="Notes">Notes</h3>
…
<h3 id="References">References</h3>
…
<h3 id="External_links">External links</h3>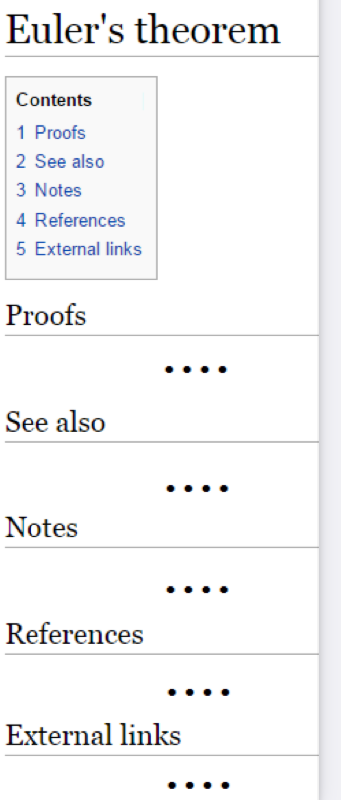
List
<li> </li> - List
<ul> </ul> - Unordered List
<ol> </ol> - Ordered List
<dl> </dl> - Definition List
ul, ol ,dl 등 이러한 리스트를 정리해주는 코드들은 어미 코드라고 한다 li 는 무조건 자식 코드이다.
1,2,3,4 리스트의 번호를 부여하고 싶다면 ol
번호 없이 그냥 점으로 리스트를 나눈다면 ul
dl 은 리스트 앞에 설명을 적고싶다면 사용하면된다
<ul>
		<li>
			<a href="#c">C++</a>
		</li>

		<li>
			<a href="#cc">C#</a>
		</li>

		<li>
			<a href="#python">Python</a>
		</li>

		<li>
			<a href="#html">HTML</a>
		</li>

	</ul>
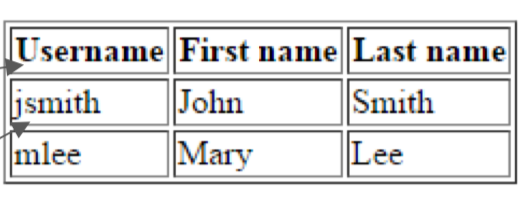
Table
<table border="1">
	<tr>
		<th>Username</th>
		<th>First name</th>
		<th>Last name</th>
	</tr>
	<tr>
		<td>jsmith</td>
		<td>John</td>
		<td>Smith</td>
	</tr>
	<tr>
		<td>mlee</td>
		<td>Mary</td>
		<td>Lee</td>
	</tr>
</table>
<tr> </tr> - Table row
<table border="1" width="50%">
	<caption>User information</caption>
	<tr>
		<th width="20%">Username</th>
		<th width="40%">First name</th>
		<th width="40%">Last name</th>
	</tr>
	<tr>
		<td align="center">jsmith</td>
		<td align="right">John</td>
		<td align="right">Smith</td>
	</tr>
	<tr>
		<td align="center">mlee</td>
		<td align="right">Mary</td>
		<td align="right">Lee</td>
	</tr>
</table>
<table border="1" width="40%">
	<tr>
		<td colspan="2">STUDENT DETAILS</td>
	</tr>
	<tr>
		<td width="30%">STUDENT NAME</td>
		<td>John Lee</td>
	</tr>
	<tr>
		<td>STUDENT NUMBER</td>
		<td>1234567</td>
	</tr>
	<tr>
		<td>UOW EMAIL</td>
		<td>jlee@uowmail.edu.au</td>
	</tr>
</table>
Index.html 을 사용해서 여러개의 html 과 이미지 파일을 하나로 묶는게 보안적으로 좋음
<!-- --> 은 주석을 적을때 사용
'코딩 > HTML' 카테고리의 다른 글
| [HTML] 리뷰 (0) | 2024.05.10 |
|---|---|
| [HTML] 자바 스크립트 응용 (Form 태그, (0) | 2024.04.22 |
| [HTML] Java Script 를 배워보자 (0) | 2024.04.11 |
| [HTML] CSS 입문 (0) | 2024.04.09 |
| [HTML] Form 을 배워보자 (0) | 2024.04.09 |