반응형
JSON은 JavaScript Object Notation 의 줄임말이다.
대부분의 웹 어플리케이션들은 XMl 이나 JSON을 이용해서 데이터를 저장한다.
JSON은 "Self-describing"이 가능하며 이해하기 쉽다.
예시)
{
    "firstName":"John",
    "lastName":"Smith",
    "domestic":true,
    "fee":100.5
}
데이터는 쉼표로 분류 가능하다
데이터는 이름과 값이 한쌍이다
자바스크립트를 JSON형식으로 변환 가능하다.
objJSON = JSON.stringify(obj);반대로 JSON을 자바스크립트로 변환 가능하다.
obj = JSON.parse(objJSON);JSON 오브젝트를 생성하는 코드
<html>
<head>
<title>JSON example</title>

<script>

function showObjectJSON(){
  //create a student object
  var studentObj = {};
  studentObj.fullname = "John Smith";
  studentObj.studentNumber = "U1234567";
  studentObj.age = 20;
  studentObj.csMajor = true;

  console.log(studentObj);

  //get JSON string from the javascript object
  var studentJSON = JSON.stringify(studentObj);

  //print the JSON string to the console
  console.log(studentJSON);
}


</script>
</head>
<body>
<h1>JSON: Example 1: JSON.stringify</h1>

<pre>

</pre>

<br /><br />

<button onClick="showObjectJSON()">
Click here to see JSON string
</button>


<br /><br />
View the console for the output.

</body>
</html>
자바스크립트를 JSON으로 변환하는 방법을 이용하면 좀 더 간결하게 코드를 짤 수 있다
<script>

function showObject(){
 //JSON string
 var studentJSON = '{"fullname":"John Smith","studentNumber":"U1234567","age":20,"csMajor":true}';

 //get javascript object from JSON string
 var studentObj = JSON.parse(studentJSON);

 //print the object to the console
 console.log(studentObj);
 console.log("Full name is " + studentObj.fullname);
}

</script>
parse를 이용해서 자바 스크립트로 변환 해주었다.
<script>

function showArrayJSON(){
  var user1 = {};
  user1.firstName = "John";
  user1.lastName = "Smith";

  var user2 = {};
  user2.firstName = "Kate";
  user2.lastName = "Williams";

  //create an array of user objects
  var userList = [user1, user2];

  //get JSON string from the javascript array
  var userListJSON = JSON.stringify(userList);

  //print the JSON string to the console
  console.log(userListJSON);
}

</script>
자바스크립트를 이용해서 john을 생성
그리고 firstName 과 lastName을 부여
kate 에게도 동일하게 부여
john과 kate를 array에 추가
stringify를 이용해서 JSON으로 변환
<script>

function showArray(){

 //JSON string
 var userListJSON = '[{"firstName":"John","lastName":"Smith"},{"firstName":"Kate","lastName":"Williams"}]';

 //get javascript array from JSON string
 var userList = JSON.parse(userListJSON);

 //print the object to the console
 console.log(userList);
 console.log("There are " + userList.length + " users");
}

</script>
Ajax-JSON
JSON 파일이 있다고 가정하고, HTML 과 자바스크립트를 이용해서 버튼을 눌렀을때 JSON파일을 불러오는 코드를 생성하자.
JSON파일

먼저 버튼을 눌렀을시 주식 정보를 불러오는 HTML코드를 짜준다
<button onClick="makeAjaxQueryMarket()">
Click here to view Stock Market Activity
</button>

<br /><br />

<div id="display">
</div>
서버에서 파일을 불러오는 코드를 짜준다
function makeAjaxQueryMarket(){
  // create an XMLHttpRequest
  var xhttp = new XMLHttpRequest();
  // create a handler for the readyState change
  xhttp.onreadystatechange = function() {
    readyStateChangeHandler(xhttp);
  };
  // get JSON file by making async call
  xhttp.open("GET", "market.json", true);
  xhttp.send();
}

// handler for the readyState change
function readyStateChangeHandler(xhttp){
  if (xhttp.readyState == 4){
    // readyState = 4 means DONE
    if(xhttp.status == 200){
      // status = 200 means OK
      handleStatusSuccess(xhttp);
    }else{
      // status is NOT OK
      handleStatusFailure(xhttp);
    }
  }
}
xhttp 불러오기가 실패 할 시 / 성공 할 시
// XMLHttpRequest failed
function handleStatusFailure(xhttp){
  // display error message
  var displayDiv = document.getElementById("display");
  displayDiv.innerHTML = "XMLHttpRequest failed: status " + xhttp.status;
}

// XMLHttpRequest success
function handleStatusSuccess(xhttp){
  var jsonText = xhttp.responseText;
  // parse the json into an object
  var marketObj = JSON.parse(jsonText);
  // display the object on the page
  displayMarket(marketObj);
}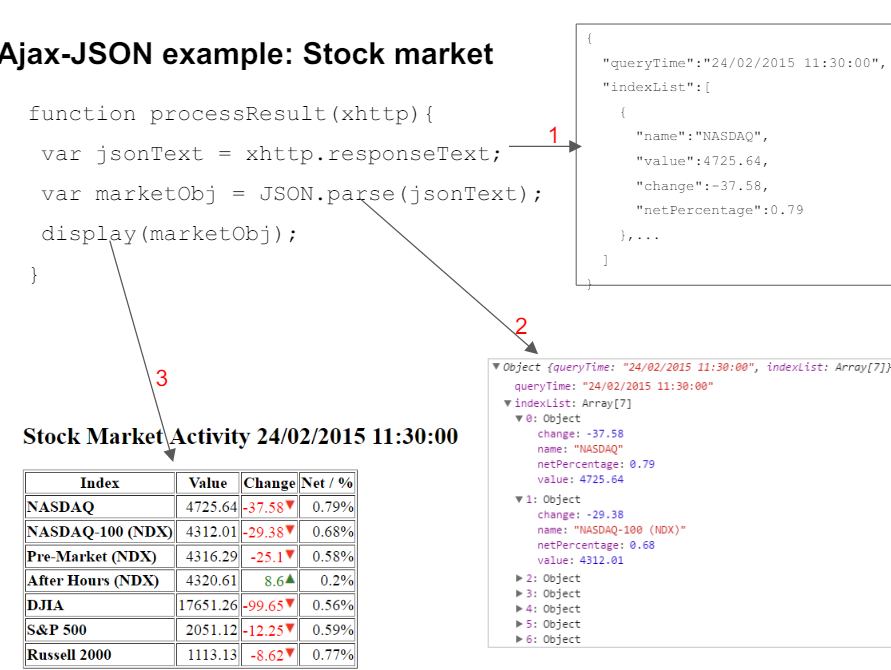
xhttp불러오기 성공 시 웹사이트에 표시되는 주식 정보
// display the market object on the page
function displayMarket(marketObj){
  // print the marketObj on the console
  // console.log(marketObj);

  // construct HTML code to display market information
  var html = "<h2>Stock Market Activity " + marketObj.queryTime + "</h2>";
  html += "<table border='1'>";
  html += "<tr><th>Stock</th><th>Value</th><th>Change</th><th>Net / %</th></tr>";

  for(var i=0; i < marketObj.stockList.length; i++){
    var stockObj = marketObj.stockList[i];
    html += "<tr>";
    html += "<td><b>" + stockObj.name + "</b></td>";
    html += "<td align='right'>" + stockObj.value + "</td>";

    if(stockObj.change < 0){
      html += "<td style='color:red' align='right'>";
      html += stockObj.change;
      html += "<img src='stockDown.png' />";
      html += "</td>";
    }else{
      html += "<td style='color:green' align='right'>";
      html += stockObj.change;
      html += "<img src='stockUp.png' />";
      html += "</td>";
    }
    html += "<td align='right'>" + stockObj.netpct + "%</td>";
    html += "</tr>";
  }
  html += "</table>";

  // show the constructed HTML code in the display div
  var displayDiv = document.getElementById("display");
  displayDiv.innerHTML = html;
}
</script>
반응형
'코딩 > HTML' 카테고리의 다른 글
| [HTML] HTML 활용 문제들 (1) | 2024.05.28 |
|---|---|
| [HTML] JavaScript 기초 (0) | 2024.05.27 |
| [HTML] XSD 를 배워보자 (0) | 2024.05.12 |
| [HTML] DTD 를 배워보자 (0) | 2024.05.12 |
| [HTML] XML 을 배워보자 (0) | 2024.05.12 |